
What you need to make a circle skirt
- Fabric—To see how much fabric you’ll need, see my previous post with circle skirt pattern and fabric calculation. I’ve chosen a brocade in a width of 29" (75 cm) from Sartor’s collection. For a 20" (50 cm) skirt my fabric table tells me I’ll need 2.8 yds (2.5 m)—to be on the safe side, I got 3 yds (2.8 m) to allow for a waistband and for any shrinkage.
- Underskirt—I made this skirt without an underskirt, but if you’ll wear tights with it (or want to keep your cool when a capricious breeze gives you a Marilyn moment), you’ll want to have one. An underskirt acts as a built-in slip, keeping your skirt from clinging to your nylon-clad legs. You can use an A-line cut, narrower than the skirt itself, so that even if you find yourself standing on a Lexington Avenue subway grate, your skirt can billow as much as it wants and the underskirt will protect your modesty.
Haven’t read part one?
Do it now:
- Thread—For most materials a classic polyester thread will do the job, but if you’re working with silk, it’s worth getting some silk thread. If you use a serger, you’ll need four or five spools; if you’re using an ordinary home sewing machine, two will be enough.
- Interfacing—You’ll need about 4" (10 cm) of medium weight fusible interfacing for the waistband. Our fusible interfacing works with minimal bubbling and irons well. There are perforated, interfacing strips made especially for waistbands (see photo), but in this tutorial we’ll use a strip of ordinary interfacing.
- Zipper—I used an invisible zipper. A length of 8" to 10" (20-25 cm) is good. It’s a good idea to use a zipper that’s longer than your zipper opening. The extra length can be left on or cut off. And consider investing in a good quality zipper like YKK.
- Button or other closure.
- Other stuff like care and content labels and fabric for pockets if you want them ????
Pockets
Circle skirts are great for pockets because there’s plenty of volume to hide them at the seams. ???? I guess I always want a little something extra, so my skirt has pockets. But feel free to leave them out. How to make pockets would be an article in itself, so we’ll just go into that some other time.
Cutting the skirt
First you have to sketch your pattern. You can use a large sheet of parchment or plain craft paper. Both work really well and are easy to come by. I’ve never had much use for classic pattern paper, it’s flimsy and kind of fussy to work with.
For longer skirts, you may want to skip putting the pattern on paper and sketch it straight to the fabric—then cut out the first segment and use it as a pattern for the others. This takes some experience—and it won’t work well with flowy fabrics—so in this tutorial we’ll work with a classic paper pattern.
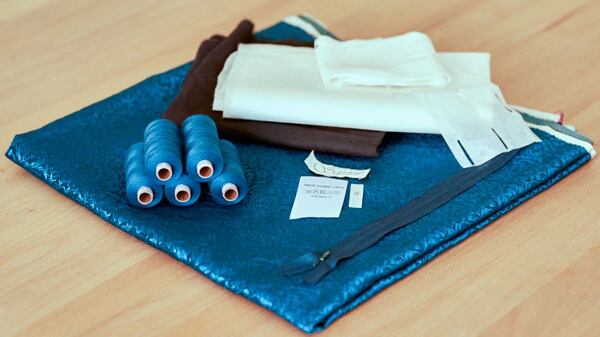
Materials for my circle skirt—Ornaments brocade in teal, polyester thread, invisible zipper, interfacing/perforated interfacing strip, black fabric for pockets, content label, size tag, branding label.
Circle skirt pattern
First you have to calculate the radius of the circle at your waist using the formula
r = waist ÷ 6.28
I’m making a size 8 skirt with a waistline of 28.5" (72 cm) so in my case, r = 28.5 ÷ 6.28 = 4.5" (or r = 72 ÷ 6.28 = 11.5 cm). Next, figure the length of the skirt. I wanted the longest skirt that would fit on my fabric without dividing the pattern into more panels, so I went with 22" (55 cm). Most of the time though, you’ll be shooting for a particular length and figuring out how to lay it on the fabric so that it will fit. You’ll find details on fabric calculation and layout in the first part of this tutorial, circle skirt pattern and cutting.
On the paper draw a line the combined length of the skirt and the waist radius, in our case 28.5" + 4.5". Then add another line the same length at a right angle, starting at the same point. You can trace the shorter curve using an ordinary compass. To draw the hemline, just hold a tape measure in your left hand at the central point of the circle and with a pencil in your right hand trace the edge. If your skirt is longer than you can reach, get someone to hold the tape for you.


Laying out the pattern
Be sure to wash and iron your fabric before you begin cutting. Always pre-wash the fabric the same way you’ll wash the garment once it’s made. If you plan to machine wash warm, then toss it in the machine and wash it on warm. If you’ll be dry-cleaning your skirt (this applies to most silks) then you needn’t pre-wash. I’m using a brocade made of polyester/rayon so I washed it on warm (40°C) and ran it through the dryer. Believe it or not, the brocade came out just fine; it shrank just a bit and the pattern is a tiny bit more raised from the surface than it was before washing. If you’re working with a fabric that frays a lot, like brocade, then you should finish the edges with a zigzag or overlock stitch before washing so it doesn’t get torn to bits.
Spread your washed and ironed fabric on a large table (or the floor) and align the edges of the fabric with the table top. The warp and weft should be perpendicular. Some of the more flowy fabrics tend to squirm around, so get your material under control or everything will come out crooked.
Plan how you’ll lay out all of your pieces before you start tracing. My 22" (55 cm) skirt will fit just right on my 29" (75 cm) brocade. If your skirt pattern doesn’t fit the fabric, you’ll have to divide it up. See how in the previous article on circle skirt pattern and cutting.
Lay the pattern on the fabric leaving room for seam allowance—I usually eyeball it, leaving about an inch (2.5 cm) at the edges and maybe one and a half inches (4 cm) at the hemline. Hold it in place with a pattern weight or a book, or pin it down, and trace with chalk. I always trace the upper and lower edges and then just draw the straight lines connecting them with a ruler directly on the fabric—it’s faster and more accurate.


Trace the front and back panels with the front panel aligned to the fold. It’s easiest to trace both pieces and then fold the fabric. On the back panel, mark the length of the opening for the zipper. Leave 7"–8" (18–20 cm).


Pin the two layers of fabric together near the seams and use a tracing wheel and coated tracing paper to transfer the pattern to the other side. That way you don’t have to trace your pieces four times, just twice; you’ll copy them over with the tracing wheel. Include all marks, like the ends of the zipper opening or pockets.
If you’ve never used a tracing wheel, now’s the time! Just put the tracing paper under the fabric and then run the tracing wheel along the pattern lines. The wheel has little teeth that press through the fabric to the paper, transferring a mirror image of your pattern onto the other side. You’ll find tracing wheels and tracing paper at most fabric shops.


Now it’s time to cut. Add a seam allowance at the edges and a couple of inches extra at the hemline—you’ll be glad you did when you hem the skirt.

Sewing the circle skirt
First, the seams
Pin the side and back seams and sew. Be careful if you’re using a lustrous fabric like satin or brocade—panels that both go with the grain should be pinned together, otherwise you’ll have a shiny part and a matte part right next to each other. Use a long basting stitch on the segment where the zipper will go, then anchor your seam and continue with a classic straight stitch. That way you can iron the seam open and unpick the basting stitch when you go in to sew your zipper.
Now try it on to see how the waist fits. If you need to make adjustments, you have some leeway in your seam allowance.


Finishing the seams
Once you’ve checked and adjusted your size, finish your seams with an overlock or zigzag stitch. For fabrics that fray easily, you can use bias tape for a Hong Kong seam—this looks super fancy.
I pressed my seams open and then finished with an overlock. If your fabric is thin, you can also press to one side and iron them down before finishing. The back seam has to be pressed open because of the zipper.
Sewing an invisible zipper
There are a number of ways to sew an invisible zipper, but this is the one that works for me. The opening should be at least an inch shorter than the zipper. The bigger the difference, the easier it will be to sew.
Finish and press open the back seam of the skirt. Since you basted the zipper opening, it should be really easy to unpick now. The fabric will be nicely folded back exactly in line with the seam.
Invisible zippers have their teeth on the back—the face side is smooth. Lay the face side of the zipper along the face side of the opening, face to face, as shown in the picture. The teeth should touch exactly the ironed edge and the top of the zipper should lie with the pull just under the waistline (marked in the picture with a pin).


Pin this side of the zipper down and then hand baste it in place. Don’t stretch the material as you stitch it—keep it nice and loose. Don’t leave out the hand basting step—it really helps tame some fabrics, especially the slippery, flowy ones.
Now zip up your zipper and pin the other side of the opening in place at the top and bottom so that you sew both sides at the same level. Then unzip it all the way and hand baste the other side of the zipper in place.


Your sewing machine ought to come with a special zipper foot, and you’ll need it. I have a plastic one from YKK that I just love, but I couldn’t find it, so I used a generic metal one.
Sew one side all the way to the end of the slit or slightly beyond, and on the other side sew to about a quarter inch (0.5 cm) short of the end of the slit. That leaves a little gap that you can sneak the zipper pull through.


As soon as you have your zipper in, run your iron over the face side of the skirt at the zipper opening one more time to hide it even better.
If your zipper is a lot longer than the opening, you can shorten it with scissors. (Tip: Hold the cut end over a lighter to melt the teeth together so that the zipper won’t come open.)
If you only have a little extra length though, just leave it where it is.

Now sew the edges of the zipper tape to the seam. It doesn’t just look better, it holds your zipper in place.

Sewing the waistband onto your circle skirt
Just like with zippers, there’s more than one way to sew on a waistband. This method is an old standby.
First trim the seam allowance at the waist of your skirt to 1/2" (or 1 cm).
What you’ll need:
- A strip of fabric
Width = 2 x desired waistband width + 1" (2 cm) for seams
Length = waistline + 2½" (5 cm) - A strip of interfacing
Width = 2 x waistband width + ½" (1 cm)
Length = waistline + 2½" (5 cm)
So if you want a 1½" (or 3 cm) waistband, then cut a strip 2 x 1.5 + 2 = 5" wide and 28.5 + 2.5 = 31" long (for a 28½" waistline). As a rule of thumb I use a one-inch overlap and an inch and a half for the part that goes under, depending on your taste… and the size of your button. For this model I chose a really narrow waistband (less than an inch) and a small button, so I only have an inch under, but if I had it to do over, I’d include a more generous button area of 1½". And don’t forget that the waistband includes seam allowances, so the overlap and underlap are going to be reduced by that once sewn.
The diagram below shows how to attach the waistband.


Sewing the waistband step by step
- First get your waistband ready. I cut my interfacing first, marked the overlap and button area, and divided the waistline length in fourths to make sewing it to the skirt easier. Then I ironed it onto the fabric strip before cutting. It works better than cutting the fabric and interfacing separately. Since my fabric is only 29" (75 cm) wide, I had to add a bit at one end. Luckily, when you join brocade along the grain it makes an almost invisible seam, so you can’t tell.
- Divide the skirt waistline in fourths. For circle skirts this is easy, because the quarter lines lie on the seams and the front center.
- Pin the waistband to the skirt face to face as shown in the diagram, lining up the quarter lines.
- Sew together and iron the seam towards the waist.


Don’t forget to check how the waistband hits on both sides of the zipper. Sometimes one side comes in a bit higher. I had to adjust mine to get it right. ????
5. Now press the unlined seam of the waistband down at the edge of the interfacing. If you’re wondering why the interfacing isn’t as wide as the fabric strip, it’s because unlined seam allowances make for slimmer seams. ????


6. Fold the waistband in half lengthwise, face to face, as shown and sew a point on one side and a straight edge on the other side a quarter inch from the edge. Trim the corners and turn the waistband right side out.


7. Pin it in place and top stitch the bottom of the waistband. You can sew in the seam to hide it.


8. The only thing left now is to sew a buttonhole and add a button. Start with the hole. It should line up with your zipper. Make it bigger than your button by a quarter inch (0.5 cm). You might try it on a scrap first. If your fabric frays a lot, like mine, start by sewing around the buttonhole with the machine and then finishing it by hand. Finishing the buttonhole with your machine can be tricky because the waistband is fairly thick and the feed dogs can have trouble moving it accurately. Anyway, hand-sewn buttonholes last longer. Now just sew on your button where the buttonhole sits.


Leveling the hem on your circle skirt
To get a nice, level hem on your circle skirt, you’ll need to put it on and mark it. Every fabric drapes differently and no two figures are alike. So the only way to get an even hem is by putting the skirt on and having someone mark the length.
Here’s how:
- Put on the skirt and the shoes you’ll wear it with. This applies just as much for short skirts as long ones. High heels change your posture, which affects how the skirt falls in front and back.
- Look in the mirror and decide on your ideal length. Move the hem up and down to see what flatters you most. You may be surprised. That’s one reason we have such a large seam allowance at the hemline. ????
- Stand up straight and keep your head up (don’t look at the ground!) and let a friendly helper mark the length all around the hem. There are various tools available to make hemming easier. The best is a chalk hem marker, which is a sort of gadget on wheels – you just move it around the skirt and squeeze a little balloon to make a thin, chalk line on the hem. It’s pretty ingenious. But if you haven’t got one, you’ll do fine with a plain old tailor’s square or even a yardstick – just measure the length from the floor and mark the hem with pins.
- Smooth the hem into a curve—lay the skirt out on your working surface and fill in the hemline with chalk. Depending on the fabric, you can get some pretty weird curves here—a fabric with a lot of drape may be significantly shorter on the bias, just because of how it hangs! A stiff fabric may have a wavy hemline, depending on how your folds fall. Just try to make a reasonably smooth line.


Finishing the hemline
There are a number of approaches to finishing a hemline. But a circle skirt, with its jagged hemline, is in a category to itself and most traditional hemming techniques go out the window here. I decided on a narrow hem—just turn it up and sew—because it’s quick and looks good.
- Finish the cut edge with an overlock or zigzag stitch so that you have just a half inch (1 cm) seam allowance.
- Fold the edge at to your hem marking and press.
- Machine sew from the front about 1/8" (2mm) from the edge. A magnetic seam guide will come in handy—just stick it the metal throat plate of your sewing machine.
And that’s it!


Thanks to my family for the expert assistance. I couldn’t have done it without you! ????
Want to learn more about making your own circle skirt pattern?
Check out the previous article:
Ideal circle skirt fabrics
Flowing fabrics – these fabrics drape nicely for a lovely, flowing circle skirt with multiple, soft folds.


Supple fabrics – these fabrics offer an ideal middle ground.


Stiffer fabrics – if you want a wide skirt that stands out and holds its shape, try a stiffer fabric.


Comments(0)