
What kind of wrap skirt are we making?
This tutorial will show you how to make a wrap skirt in a circle cut. To be precise, we'll be making a knee-length half-circle skirt with a ruffle. There are two variants included here: A simple skirt for beginners with a straight hem at the bottom and a skirt with a ruffle for intermediate sewers.
When preparing your pattern, there's no need to juggle measurements or figure out where to place darts; adjusting the width is easy and with its generous drape, a circle skirt fits all body types.
To make a longer wrap skirt, simply adjust the length; everything else is the same.

What you'll need
- Fabric
- Needle and thread to match
- Marking chalk, a tailor's square or yardstick, sharp scissors, tracing paper, a pencil; if you've got a rotary cutter and mat, go ahead and use them
- Sewing machine
There's no need to download a pattern – you'll be making your own.
Choosing fabric
For this wrap skirt you can use any fabric with at least a little drape.
- Silk: Crepe de Chine, silk satin, or even habotai, chiffon, or voile if you don't mind a little sheerness (this sort of a wrap skirt makes a perfect ballet skirt)
- Rayon: Dressmaking fabrics in lyocell, Tencel, EcoVero, and other materials with drape and breathability make great summer skirts – the fabric pictured here is lyocell
- Linen: Any lightweight or medium linen (up to about 180 gsm) will work, but might be best without the ruffle
When choosing fabric, be aware of how sheer it is; the back panel is just one layer with no lining. A very lightweight fabric in a light color like white, yellow, or pink may shine through.
How much fabric
First decide how full the finished skirt will be: A full circle? A half? The example in this tutorial is a half-circle skirt. A wrap skirt has a back panel and two overlapping front panels, so it takes one and a half times the fabric of an ordinary skirt.
- A half-circle wrap skirt actually needs three quarters of a circle
- A full-circle wrap skirt needs three halves
You will also need:
- A waistband: Decide how wide you want it and double the width, then add two seam allowances of 5/8 inch each (1.5 cm); depending on how many segments make up the waistband, you'll need to cut two or three pieces; more on that below
- Ruffle: If you decide for a ruffle, include that in your calculations
The table below gives fabric requirements for the most common scenarios. If you want to know more, see our full post on circle skirt patterns.
Doing a trial run
When you have pieces of odd shapes and sizes, sometimes it's just easier to do a trial run to see how everything lays out on your fabric; sketch everything out in miniature (at 1:10 if you use the metric system) and lay it all on a strip of paper of proportionate size (representing the fabric) to see how it fits.
This is a nice trick to know when you're sewing with a print and you need to center or line up a pattern and don't want to gamble on how much fabric you'll need.
Of course, if you are buying fabric in person, you can always bring your pattern pieces to the shop with you and lay them out on the fabric before you buy (at Sartor anyway).
 wide – ruffle width 4 in (10 cm), base skirt length 19 3/4 in (50 cm)")
The table below shows how much fabric for a bolt width of 55 inches (140 cm) is needed for three different skirt lengths in both half-circle and circle variations. The yardage is figured roughly for US sizes 6–10 (European 36–42); the waistline increases by about 1.5 inches (4 cm) per size, which slightly lengthens the diameter of the skirt. For US sizes 12–14 (EU 44–46) add another 4 inches (10 cm) and for larger sizes another 4 inches (10 cm).
For a one-and-a-half-inch waistband (4 cm) add 12 inches (30 cm) and for the ruffle it depends both on how wide of a ruffle you want and the circumference of the skirt. The skirt length given in the first column is without the ruffle, which means that the ruffle will make the finished skirt longer (so the skirt in the first row is 15 3/4 inches long without the ruffle, or 19 3/4 inch long when a 4-inch ruffle is added)
| SKIRT LENGTH | 1/2-CIRCLE skirt | CIRCLE skirt | WAIST-BAND | RUFFLE 4 INch | RUFFLE 8 INCH |
|---|---|---|---|---|---|
| 15 3/4 in (40 cm) | 51 in (130 cm) | 71 in (180 cm) | + 12 in (30 cm) | + 39 in (100 cm) | + 67 in (170 cm) |
| 19 3/4 in (50 cm) | 63 in (160 cm) | 95 in (240 cm) | + 12 in (30 cm) | + 47 in (120 cm) | + 75 in (190 cm) |
| 23 1/2 in (60 cm) | 79 in (200 cm) | 118 in (300 cm) | + 12 in (30 cm) | + 55 in (140 cm) | + 83 in (210 cm) |
Wrap skirt pattern
To make a wrap skirt, you will need to sketch pieces for one back panel and two front panels. When you wrap the skirt, the front panels will overlap. The front panel that ends up underneath will be the same size and shape as the back panel; the one that stays on top is not as wide and can have a rounded edge. Let's see how it works.

Measuring and drafting
For your wrap skirt pattern, you need only two measurements: Waist and skirt length.
Measure around your waist with a measuring tape. There's no need to add any wiggle room, quite the opposite, measure tight because you'll always tie the skirt to fit you perfectly. A wrap skirt that's too big is actually clumsier to tie than one that's an inch or two smaller at the waist.
To draft the pattern, you'll need to know not just the circumference (C) of your waist, but its radius (r). So dip back into your school math for the formula:
r = C/2π
For a circle skirt you use the radius. For a half-circle skirt, multiply the radius by two to get a working waist radius, otherwise the waist on your finished skirt will have only half the circumference it needs. Logical, right?
To get the radius for the whole skirt panel, add the working waist radius to the skirt length.
Now just sketch your pieces (you can use a yardstick or a pencil tied to a piece of string as a makeshift compass); if you are making a half-circle skirt, your basic panel piece will look like the quarter circle in the image below.

Here's an example:
- Let's say your waist (circumference) is 30 inches (77 cm)
- Calculate the waist radius: r = 30/(3.14 × 2), so r = 4 3/4 inches
- For a half-circle skirt, multiply r by two: 2r = 9 1/2 inches (use this number when making the waist radius on the pattern)
- Let's choose a base skirt length of 19 3/4 inches (50 cm)
- Radius for the whole skirt: 9 1/2 + 19 3/4 = 29 1/4 inches
Skirt length
Your wrap skirt can be as long or short as you like. If you are adding a ruffle, make the base skirt shorter by the ruffle width. Your ruffle should be at least 3 or 4 inches wide (8–10 cm). But you can make it wider, 6 or 8 inches or even more.
The example uses a four-inch ruffle (10 cm) on a base skirt of 19 3/4 inches (50 cm), which makes a finished skirt that hits at the knee. A full-length wrap skirt would come in at about 39 inches (100 cm), depending on how tall you are.
Cutting the upper front panel
Which front panel will be on top? Usually wrap skirts are tied at the left, so it will be the panel on the right (the one that shares a seam with the back panel on your right side) that wraps over.
Two panels will use the base panel pattern – for my half-circle skirt, two quarter circles. You'll trim back the upper front panel on one side by folding the pattern in half, then folding the outer half in half again, and cutting off the last quarter segment – see the image below.
Rounded corner
For a straight front edge, that's all there is to it. To make a rounded corner (and if you're adding a ruffle), mark halfway along the bottom of the last quarter and halfway along its vertical edge – as shown below – and sketch a nice arc between the two points. You can do this freehand (it doesn't have to be absolutely perfect), or use a French curve if you've got one in your sewing box.

Seam allowance
Add the usual seam allowance of 5/8 inch (1.5 cm) for the side seams and at the waist. For the vertical edge of the lower front panel, leave a full inch (2 cm) to allow for a double fold; if your skirt will have a straight edge on the upper front panel, then there too.
- For a skirt without a ruffle that's just hemmed along the bottom, leave 3/8 inch (1 cm). If you have a rounded front panel, this applies for the vertical edge too (not 2 cm as you would leave for a straight vertical edge).
- If you're adding a ruffle, include a narrow seam allowance 1/4 inch (0.7 cm) and for the ruffle itself, add the same on the side where it joins and allow 3/8 in (1 cm) for the finished the edge.
Wrapping around
A wrap skirt calls for a long waistband. That's because it includes the following:
- Waistband edges for all panels, meaning the back panel (half your waist circumference), lower front panel (the same), and the upper front panel (the same minus the bit you cut away)
- Plus one more half-waist circumference where the band wraps behind your back
- And two ties 24–28 inches long (60–70 cm)
In the image below, the dotted yellow line shows where the waistband is sewn to the skirt. The yellow ellipse shows where the pull-through hole is. When the skirt is finished, this hole will be on your right side; you'll pull the band through there and wrap it behind your back to the left, where you'll tie it.

In our example, the waistband math comes out like this:
15 + 15 + 11 1/4 + 15 + 28 + 28 = 112 1/4 inches
(half C + half C + upper front + half C + tie + tie)
You can make the pull-through hole as an ordinary button hole, but since the waistband is made from multiple pieces anyway, you could just place a seam there and make the gap that way. Try placing other seams so they match up with seams on the skirt too.
Waistband width
Don't make your waistband too wide. With nothing to reinforce it, a very wide band could fold over when you wear it. A maximum of 1.5 inches (4 cm) is a good rule of thumb; in our example, the waistband is one inch wide (2.5 cm).
Make your waistband pattern piece twice as wide as the finished waistband + two seam allowances of 5/8 inch (1.5 cm). For a 1 inch waistband for example:
2 x (1 in) + 2 x (5/8 in) = 3 1/4 inches
The waistband pattern is just a straight strip of fabric of the calculated width (above) and length (we'll do that below). Cut the waistband pieces straight across the grain of the fabric.
Waistband length
Depending on your waist circumference, you'll need to cut two, three, or more segments.
- For two segments: Place the seam at your left side (between the back panel and the lower front panel) and make the pull-through hole as you would a button hole
- For three segments: Place one seam at your left side and the other at the edge of the lower front panel so that it remains hidden under the skirt when tied
For our example, there are three waistband segments (remember to add seam allowance):
- Tie + the part that wraps in back: 43 inches (108.5 cm)
- Lower front panel + back panel: 30 inches (77 cm)
- Upper front panel + tie: 39 inches (99 cm)
If you're sewing with very narrow fabric and will have multiple pieces, try to place the seams so that they line up with the skirt seams or edges or so that they are hidden.
Getting ruffled
Not adding a ruffle? Skip straight to the sewing part. Want a ruffle? Get out your tracing paper, a ruler, and a compass.
How do you make a ruffle?
There are actually several types of ruffle (circular, cascading, spiral, double-sided, and straight). This skirt takes both a circular ruffle and a spiral ruffle. A circular ruffle is simply cut as a curved piece (like a rainbow) and then the shorter inside edge is sewn to a straight piece of fabric. The difference between the inner and outer circumference of the ruffle is what makes that pretty wavy effect.
 and along on a straight edge (below)")
Sew a circular or spiral ruffle on the vertical and it makes a nice cascade effect. That's known as a cascading ruffle.
This skirt combines the two effects: a cascading spiral ruffle on the vertical edge of the front panel and a wavy circular ruffle along the bottom of the skirt.
To get a really wavy cascade you want the smallest inner length possible for your ruffle. This is achieved through the clever trick of cutting it as a spiral. This is what you'll use for the ruffle on the upper front panel. The other panels take a classic circular ruffle.

Spiral ruffle for the front top panel
To sketch your spiral ruffle, you'll need to have a little fun with geometry.
- Draw a straight line on your tracing paper and mark point A somewhere near the middle.
- Put your compass on point A and trace a circle with a diameter equal to the width of your ruffle plus seam allowances, for example 4 in + 3/8 in + 3/8 in = 5 1/4 inches (13 cm). To make a circle with this diameter, set your compass to 1/2 that number (for the radius), so 2 3/8 inches (6.5 cm). Mark the points where the circle intersects with the line point B and point S.

- From point B trace a circle with twice the diameter.

- Return to point A and trace a circle three times the diameter of the first circle. Mark the point where the three circles cross the line as point C.

- Return to point B and trace a circle with four times the diameter of the first and mark where it crosses the line as point D.
- Now take a marker and go back to point S (for start!) and start tracing your spiral as shown. Trace along the the curves and whenever they meet, follow the larger one. The original circle at the center will be cut out and discarded.

- The spiral path is the internal length of the ruffle, so it has to be as long as the edge of the upper front panel. Continue adding ever larger circles until the ruffle is long enough and then add a few inches (10 cm) more for good measure. (If your compass is not big enough, you can use a yardstick.)
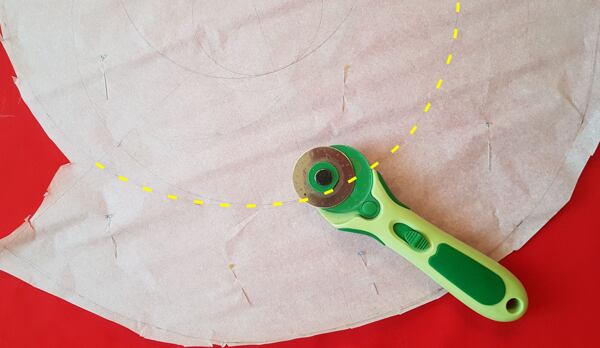
Rotary cutter or scissors
If you have a rotary cutter like the one pictured below, this part will be a piece of cake. First snip out your pattern along the edge and pin it to the fabric, then cut along the spiral.
If you're using scissors, cut the whole spiral from the paper and carefully trace it onto the fabric before cutting. Another option is to copy the pattern onto the fabric using transfer paper and a tracing wheel.
Cut off the point at the end of the ruffle so that the initial ruffle width is 1 1/4 inches (3 cm) plus seam allowance. This shortens the ruffle a bit, so make sure you've added extra length at the other end.

Circular ruffles
For the back panel and lower front panel, you need two circular ruffles. Calculate or measure the length of the hem and trace a circular ruffle (a circle or half circle) with that internal length.
A half circle takes up less room on the fabric. If you haven't got enough fabric, you can flatten the curve a bit, but your ruffles won't be as wavy.

")


Comments(1)