
Choosing the right fabric
The benefits of sleeping in bedding made of real silk is something we’ve already covered in our blog, along with useful tips for choosing the right fabric. This time around we’re going to take you through the process of sewing a silk pillowcase step by step.
For tips on choosing silk fabric for this project see our previous post Best fabrics for a silk pillowcase.
Before you start sewing
Anyone can sew a pillowcase – all it requires is a few straight cuts and seams, especially in its simplest version without buttons or zippers. Beginning sewers should choose an easy-to-handle fabric that won’t wiggle away from you while you work. Some good choices might be duchesse or another heavy satin, a smooth dupioni, or a plain silk weave. Silk charmeuse and crepe de Chine are materials better suited to advanced sewers.
For this tutorial, choose a woven fabric, not a knit like silk jersey.
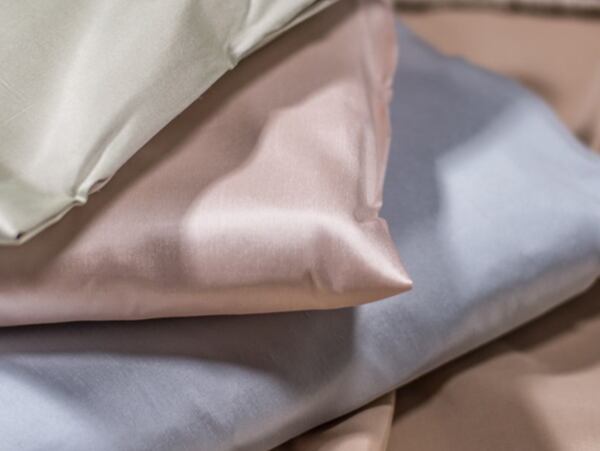
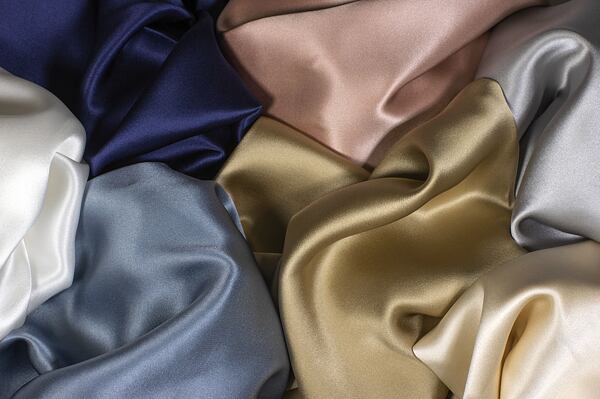
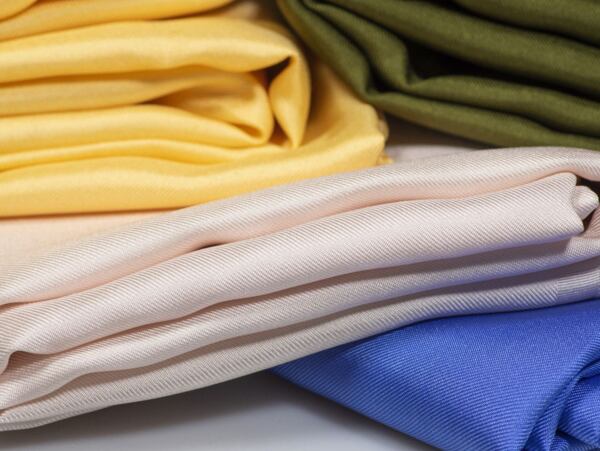
Silk pillowcase fabrics for beginning sewers
In addition to fabric, you will need:
- Universal machine needle size 12 or 14 (EU 70 or 80) – a finer needle is not necessary
- Ordinary polyester thread matching the color of your fabric – silk fabric need not be sewn with silk thread
- A tailor’s square or a yardstick
- Tailor’s chalk or a marker with disappearing ink – use white chalk even on pale colors; colored chalks can leave indelible stains
- Extra fine pins – don’t use ordinary dressmaking pins on silk, instead use pins specially made for fine fabrics (for example, Clover Extra Fine 0.4 mm quilting pins). This is especially true for satin and taffeta. If you can’t get your hands on extra fine pins, use clips instead – they won’t leave holes in the fabric.
- Good, sharp scissors – professional sewing scissors are best, but you can use any good, well sharpened scissors
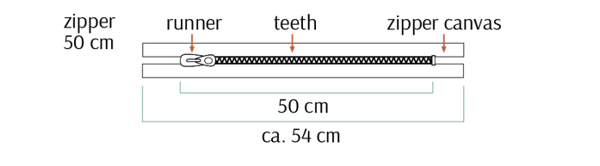
- A zipper – If you decide to make a pillowcase with a zipper (we’ll talk about some other options below), buy a size 3 open-ended coil zipper (size 3 means the teeth are 3 mm across). Get on that’s as long as the short edge of your pillow. The zipper will be hidden in the seam, so the color does not have to match exactly. A longer zipper can be shortened. If you use an open-ended zipper, you’ll stitch the end closed. Zipper lengths are measured by the length of the zipper itself, so a 20-inch zipper has 20 inches of teeth but the tape is an inch or so longer. The ends of the tape will be sewn into the seam allowance
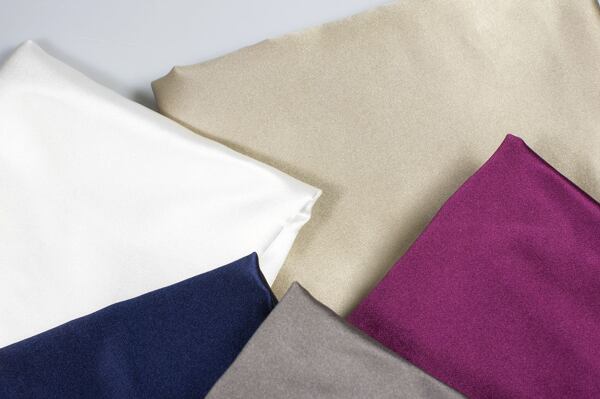
Silk pillowcase fabrics for advanced sewers
Types of pillowcase closures
Before you begin, decide how you want to close your pillowcase.
Zipper or buttons in back
Back closures are more commonly used for decorative pillows than for pillows you plan to sleep on. The drawback is that you can only use the pillow on one side – that is, unless you don’t mind waking up with button marks on your face.
Side seam zipper
Here the zipper is hidden in the seam on the pillow’s short end. You can turn the pillow over to either side and always have a smooth surface to lay your head on.
This is the type of closure used in this tutorial.
Back flap
You can make a pillowcase without any hardware at all, just with a fold-over flap on the back. Aside from the fact that this means you will only be able to use the pillow on one side, this sort of pillowcase works better for pillows that hold their shape (such as memory foam). A back flap requires a bit more fabric than a zipper or button closure.
Cutting your fabric
Depending on the size of your pillow and the width of your fabric, you will cut either two pieces or one long one that you will fold in the middle, saving yourself a seam.
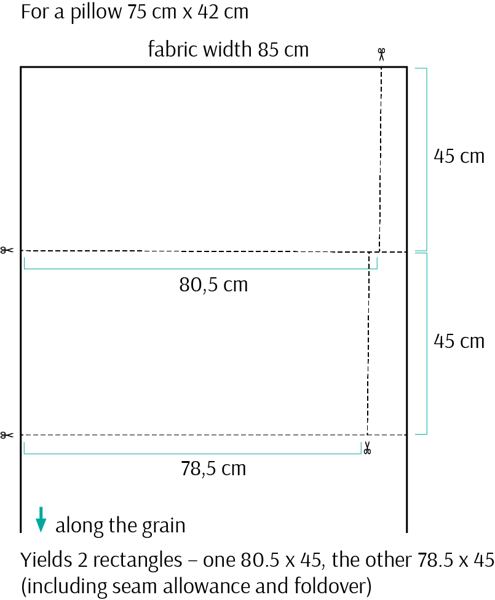
Because the zipper is sewn on the short side of the pillow, we have to sew the two longer seams. For this tutorial I chose a lovely silvery gray duchesse in a silk cotton blend with a width of 33 inches (85 cm). My pillow measures 30 x 17 inches (75 x 42 cm), so it works best to place it crosswise on the fabric. To find out how much fabric to order, calculate two times 17 inches plus seam allowance. If I tried making it with a single piece, I would have a fold on one of the long sides, making it impossible to sew in the zipper, so I have to cut the pattern in two pieces.
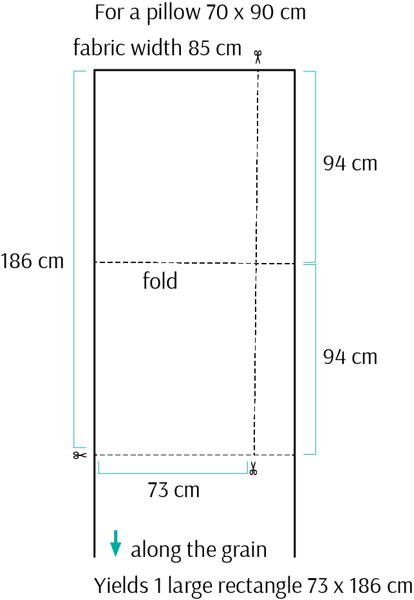
For a large silk pillowcase measuring 28 x 36 inches (70x90 cm) I would have to orient it lengthwise on my fabric in order for it to fit. To find out how much fabric to order, I’d calculate two times 36 inches of fabric plus seam allowance – the pillowcase would be folded on one of the short sides and sewn on the long sides, which allows for sewing the zipper on the remaining short side, so I can use a single piece of fabric.
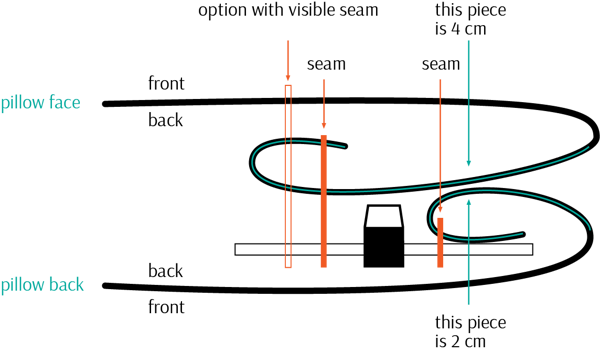
Seam allowance and zipper flaps
Add a half inch (1.5 cm) for a seam allowance – for fabrics that fray easily (such as silk dupioni) allow 3/4 inch (2 cm).
For the flaps concealing the zipper add a wider seam allowance – 3/4 inch (2 cm) on the lower piece and 1 ½ inches (4 cm) on the upper.
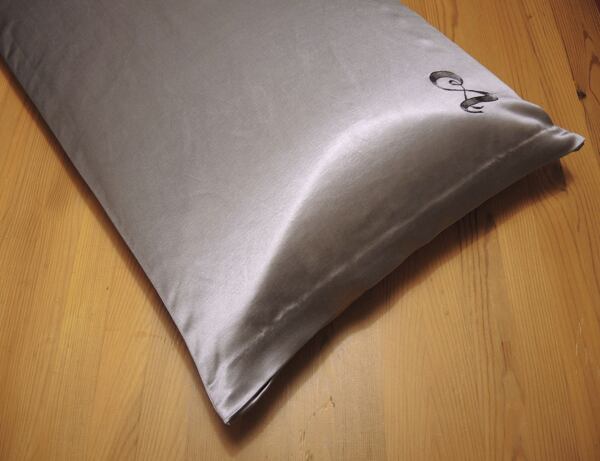
Adding a monogram
You may have noticed the monogram in our photos. It was done with silk embroidery floss from our selection, which nicely matches the silky sheen of this duchesse satin. A good quality cotton mouliné floss will work too. It’s easier to do any needlework before you piece your project together, but, obviously, it can be done afterwards too.
Pillowcases with embroidered details should be laundered inside out to protect the stitching from damage.
Adding a zipper
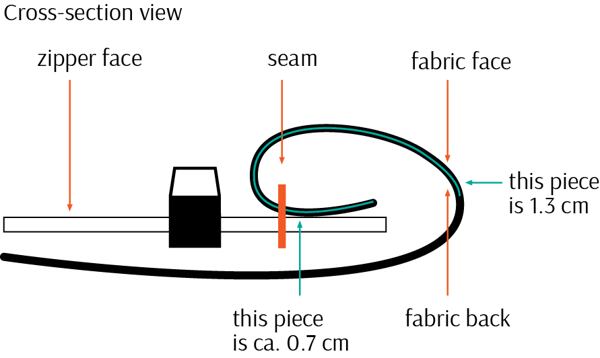
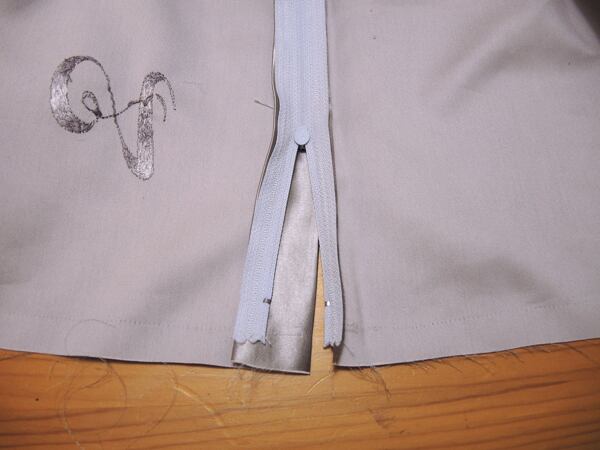
Lay the zipper face down on the face side (the shiny side of the satin) of the piece with the shorter (2 cm) fold and stitch it on. If your zipper is longer or shorter, you will later sew along the seam (1.5 cm from the edge) so that there is no hardware exposed.
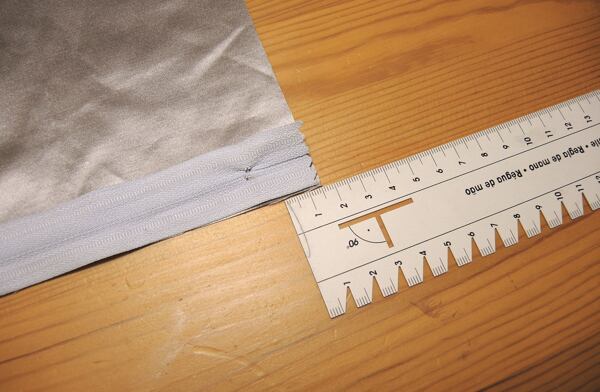
Place the zipper face down on the face side of the fabric (here, the shiny side). At the edge, the seam will run a half inch (1.5 cm) from the edge of the fabric (your seam allowance), so the ends of the zipper tape will be sewn into the seam.
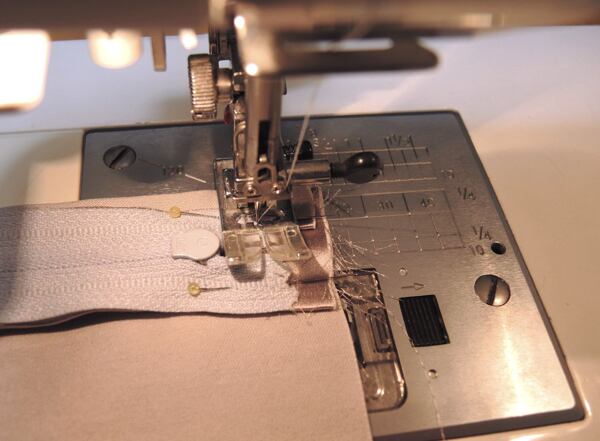
The distance from the edge where the zipper will be sewn depends on the width of the tape. For a size 3 coil zipper, that comes to roughly a quarter inch (7–8 mm) from the edge. Use a zipper foot to sew the zipper.
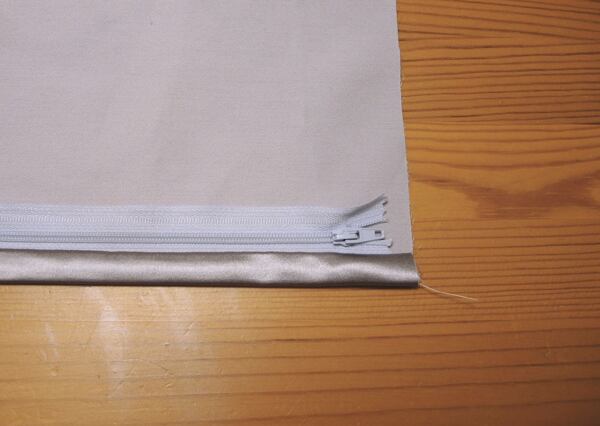
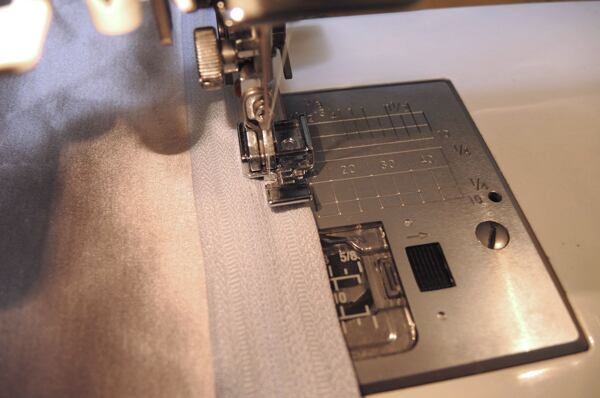
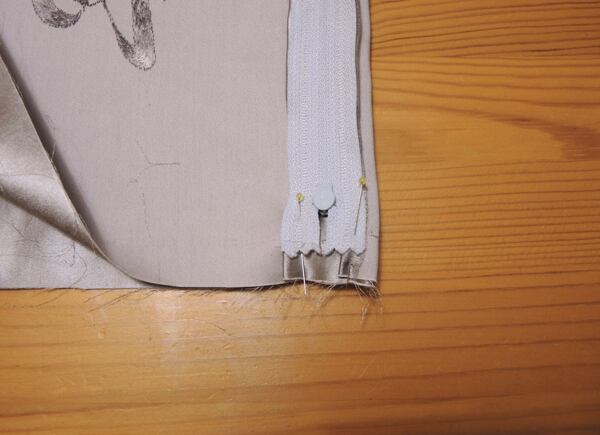
After sewing on the zipper, turn the piece over as shown in the photo and press. Fold the fabric over so that you use the whole flap width – remember, we left ¾ inch (2 cm) for the flap, so if you have sewn the zipper a quarter inch (0.7 cm) from the edge, you have a half inch (1.3 cm) extra – that’s the shiny strip visible in the photo below. Now you can sew the flap, along with the zipper, one more time, this time catching all layers (unless you do not want any visible stitching on the bottom side of the pillowcase, in which case you can later stitch it in place by hand from the back – see below for details).
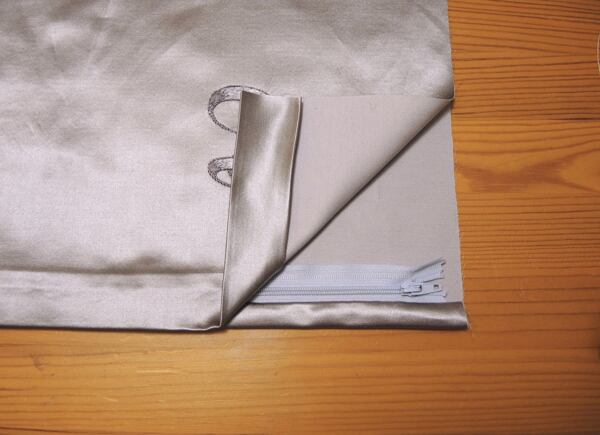
On the other piece you will press the fold first. Fold over 1 ½ inches (4 cm) and then tuck under 3/8 inch (1 cm) from the edge so that the rough edge of the fabric is hidden. When you lay the two pieces on top of each other, the wider fold should fall almost exactly to the edge of the zipper, as shown in the photo.
Sew the other half of the zipper into the second pillowcase piece. You can sew through all layers unless, again, you do not want to have any visible stitching on the face side, in which case, just sew the zipper to the bottom of the foldover. You can later hand stitch the fold in place from the back.
Putting it all together
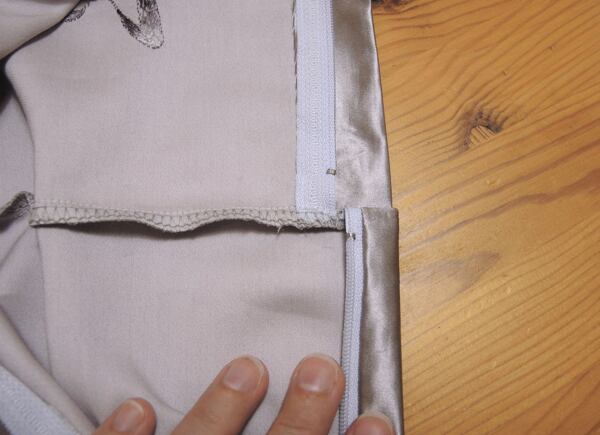
Lay the pieces side by side as shown. The piece with the wider zipper flap will remain folded; the other lies flat.
Now close the zipper (in the above photo I left it open so you could see how the pieces are arranged alongside each other). Fold the lower side of the pillowcase (with the narrow zipper flap) underneath, folding back in the opposite direction along the line where it had been pressed; the two pieces should now lie with the face sides together.
Sew the two pieces together along the whole long side starting at the zipper and catching all layers, including the zipper tape. Be careful as you sew not to hit any of the zipper’s hardware with your needle.

Do not sew the pillowcase all the way around! Start with one long side, then do the second long side, starting at the zipper both times. If you have laid your pieces correctly, the edges will match up. Put your hand inside and undo the zipper, then sew the final, short end.
If you are sewing from one long piece folded at one short end, remember to undo the zipper before sewing your final seam – it’s no fun trying to unzip it once the whole thing is sewn shut. Save yourself the trouble.
Finishing touches
Now you’re almost done. All that’s left to do is trim the seam allowance and finish the rough edge – use pinking shears or a zig-zag stitch. An overlock machine will trim the seams for you. Don’t forget to trim the corners so that they will be easier to turn right side out.
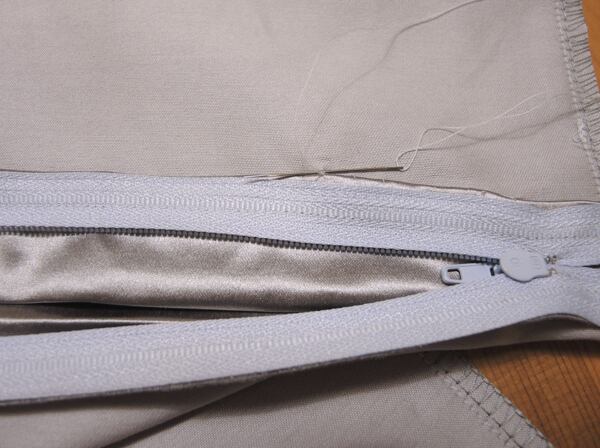
If you decided not to sew through all layers in your zipper flap, you can secure it with a few hand stitches. Working from the back side, use your needle to catch just a couple of threads. The stitches will not be visible from the face side. Do the same with both the wide and narrow zipper folds.

And that’s it. There’s nothing very difficult about sewing a silk pillowcase. If all goes well, it will be done in a single evening. Then you can slip it over a pillow and look forward to dreaming on silk!
Have you ever sewn a silk pillowcase?
Are you ready to try it with this tutorial?
Share your story with the community!

Comments(1)